


Table of contents
- Introduction
- Prerequisites
- Setting Up the Project
- Deleting unnecessary files and displaying Hello World
- Creating the to-do-list app
- Handling Form Submission:
- Preventing Page Refresh:
- Creating an array of the tasks
- Initializing State:
- Capture the changes in the submitted text
- Handling empty string
- Completing the handleSubmit function:
- WORKING ON EDIT FUNCTIONALITY
- Validation check for edit functionality
- Final code
- Conclusion
Introduction
In this tutorial, you will guide a step-by-step approach on how to create a to-do app using React with detailed explanation. This guide will help you harness the power of React and build a functional and interactive to-do application. So, let's get started!
Prerequisites
Before we embark on this coding adventure, let's make sure you have the necessary tools and knowledge. Here's what you'll need:
Basic understanding of HTML, CSS, JavaScript.
Node.js installed on your machine.
Familiarity with React and its concepts.
If you meet these prerequisites, you're all set to proceed to the next step!
Setting Up the Project
To create a new React project for our to-do app, we'll use Create React App, a tool that sets up a new React project with the necessary configuration. Follow the steps below to install Create React App and create your project:
Check Node.js installation: Before proceeding, ensure that Node.js is installed correctly on your machine. Open your terminal or command prompt and run the following command to check the installed Node.js version:
node --versionYou should see the version number displayed. If not, please refer to the previous section on how to install Node.js.
Install Create React App: In your terminal or command prompt, run the following command to install Create React App on your machine:
npm install create-react-appThis command will install Create React App, allowing you to use it to create new React projects.
Create a new React project: Once Create React App is installed, navigate to the directory where you want to create your todo app project. In the terminal or command prompt, run the following command:
create-react-app to-do-listThis command creates a new React project named "to-do-list" in a directory with the same name. It sets up the project structure and installs the necessary dependencies.
Navigate into the project: After the project is created, navigate into the project directory by running the following command:
cd to-do-listThis command will take you into the "to-do-list" directory, where your React project files are located.
Start the development server: To start the development server and run your React app, run the following command:
npm startThis command will start the development server and open your React app in a web browser. Any changes you make to your code will automatically be reflected in the browser.
Congratulations! You have now installed Create React App, created a new React project for your todo app, and started the development server. You're all set to begin building your to-do app using React!
Deleting unnecessary files and displaying Hello World
Before going forward, we can delete the unnecessary files that are not required for our to-do-list app:
Open Visual Studio Code on your computer.
Click on "File" in the top menu bar and select "Open Folder".
Navigate to the directory where your project is located and select the folder that contains your project files.
Once the project is opened in Visual Studio Code, you will see the file explorer on the left-hand side of the editor.
Locate the
setupTests.js,reportWebVitals.jsandApp.test.jsfiles in the file explorer.Right-click on each file and select "Delete" from the context menu.
Now, let's modify the App.js file and App.css.
 import React from 'react';
 import './App.css';

 const App = () => {
   return (
     <div className="app">
       <h2>Hello World</h2>
     </div>
   );
 }

 export default App;
And here's the updated code for
App.css:.app { min-height: 100vh; display: flex; justify-content: center; align-items: center; background-color: #282c34; color: white; }You will see a Hello World output in your browser.
Creating the to-do-list app
For creating to-do-list app, we can update the component App in App.js.
Step 1: Add the app and the container div :
import React from 'react';
import './App.css';
const App = () => {
return (
<div className="app">
<div className='container'>
<h1>To do list app</h1>
</div>
</div>
);
};
export default App;
Step 2:Update the CSS to style the container div.
.container {
display: flex;
height: 80vh;
border: 1px solid grey;
padding: 20px;
flex-direction: column;
align-items: center;
font-size: 20px;
color: white;
}
Step 3: Add a form inside the container div with an input field and a button.
<form action="">
<input />
<button>
GO
</button>
</form>
Step 4: Create an unordered list (ul) to display the tasks.
<ul>
<li>
<div>
<span>task1</span>
<button>Edit</button>
<button>Delete</button>
</div>
</li>
<li>
<div>
<span>task2</span>
<button>Edit</button>
<button>Delete</button>
</div>
</li>
</ul>
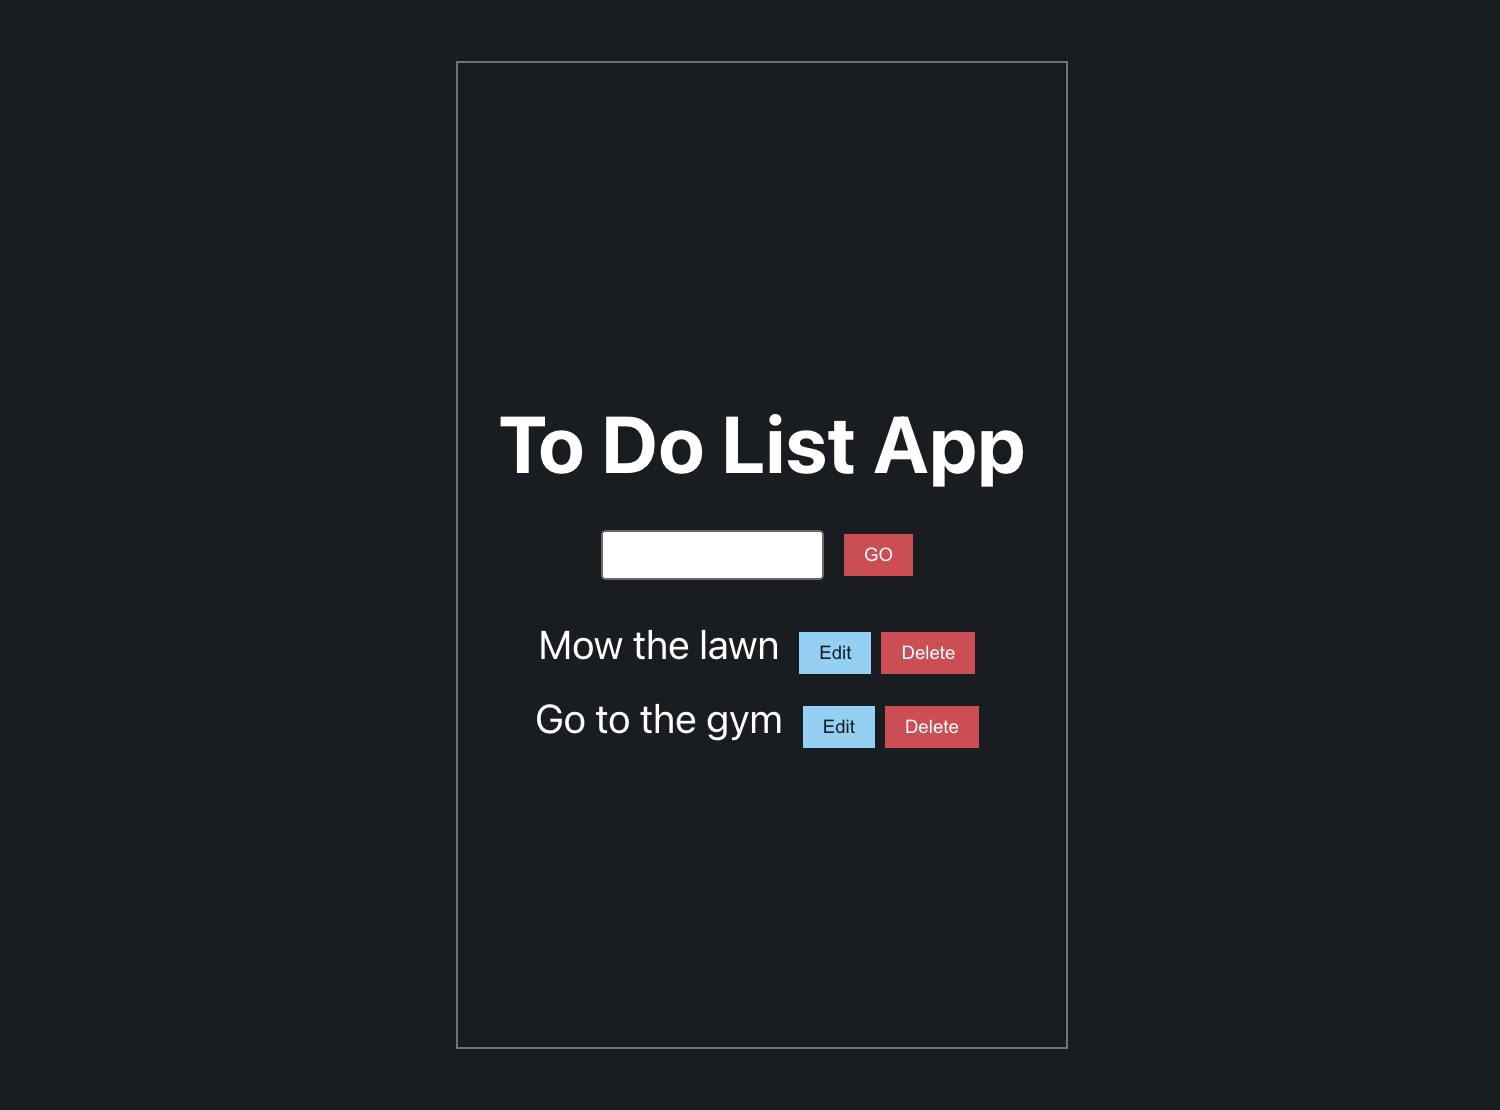
Step 5: Apply CSS to style the app, container, and other elements.
 .app {
   min-height: 100vh;
   display: flex;
   justify-content: center;
   align-items: center;
   background-color: #282c34;
   color: white;
 }
.container {
display: flex;
flex-direction: column;
align-items: center;
justify-content: center;
height: 80vh;
border: 1px solid grey;
padding: 20px;
font-size: 20px;
color: white;
text-align: center;
}
h1 {
margin-bottom: 20px;
}
form {
display: flex;
align-items: center;
margin-bottom: 20px;
}
input {
padding: 5px;
margin-right: 10px;
}
button {
padding: 5px 10px;
background-color: #61dafb;
color: #282c34;
border: none;
cursor: pointer;
}
ul {
list-style: none;
padding: 0;
margin: 0;
}
li {
margin-bottom: 10px;
}
div {
display: flex;
align-items: center;
}
span {
margin-right: 10px;
}
button {
margin-right: 5px;
}
button:last-child {
background-color: #ff3860;
color: white;
}
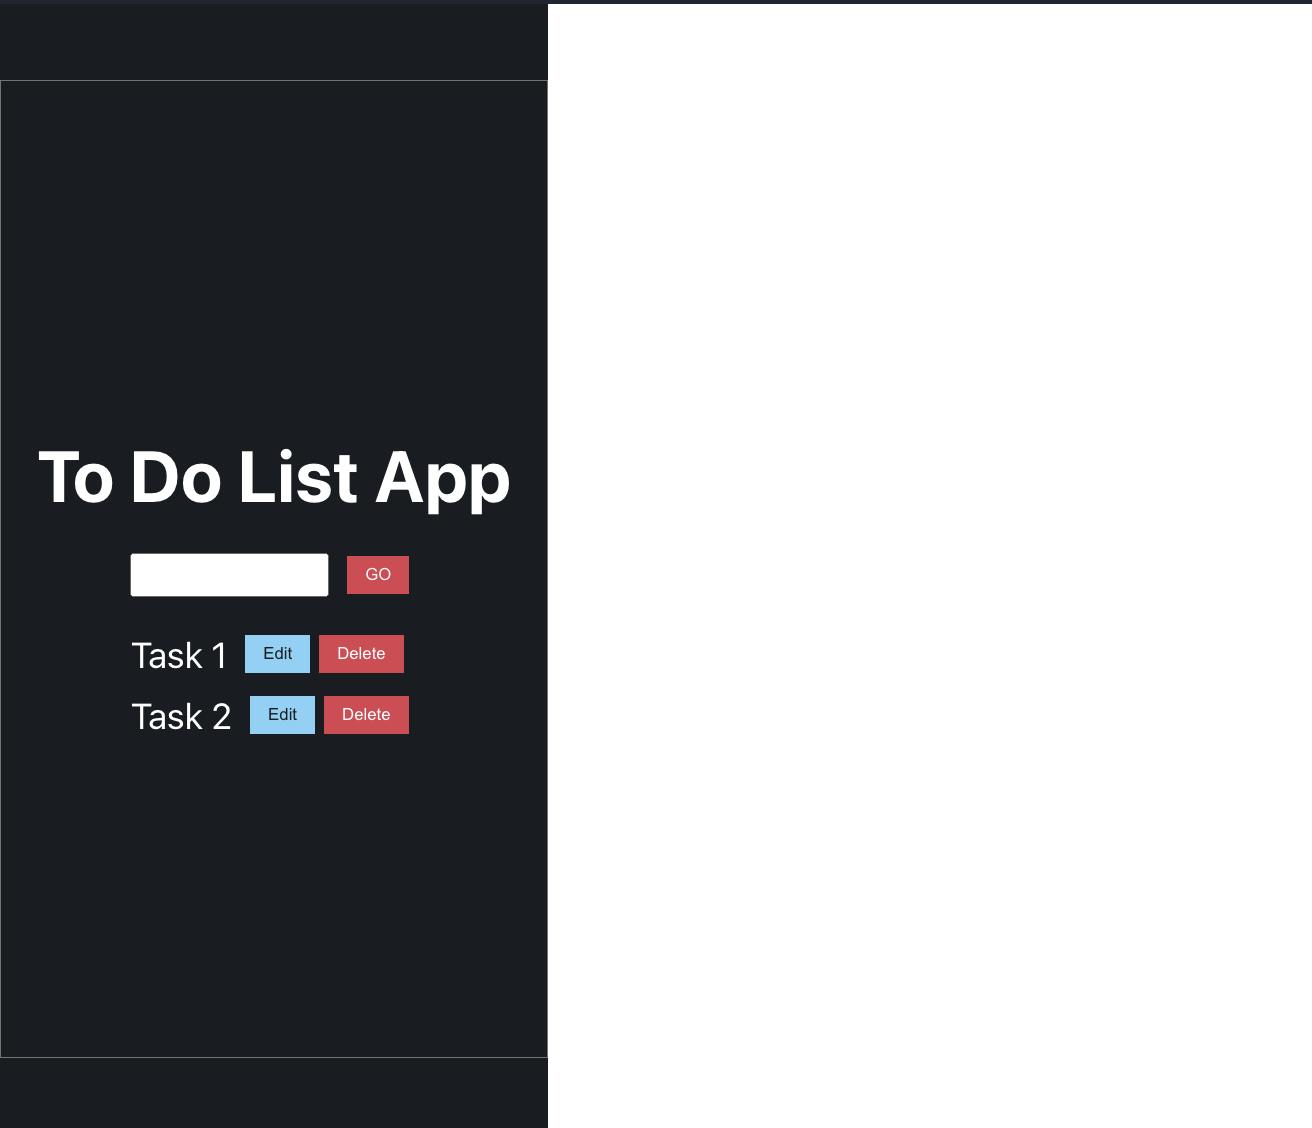
We created a basic structure for the app and designed the user interface. However, the buttons in the app are not functional. Now, we will focus on adding functionality to the buttons and making them interactive.
To achieve the functionality where the input value is submitted and appended to the todos array, we will make some modifications to the existing code. Let's go through each section step-by-step:
Handling Form Submission:
To establish the functionality of the submit button, we can set the type attribute to 'submit', which triggers the form submission. Further, we need to assign the handleSubmit function to the onSubmit event of the form element. This ensures that the handleSubmit function is called when the form is submitted.
<button type='submit' onSubmit={handleSubmit}>GO</button>
Preventing Page Refresh:
Inside the handleSubmit function, we need to prevent the default form submission behaviour, which refreshes the page.
const handleSubmit = (e) => {
  e.preventDefault();
};
By invoking e.preventDefault(), we prevent the default behaviour of form submission, which is refreshing the page.
Creating an array of the tasks
const myArray = [
    { id: 1, task: "Bring apples" },
    { id: 2, task: "Do meditation" },
    { id: 3, task: "Go to gym" }
  ]
Initializing State:
We need to declare and initialize two state variables: todo and todos. The todo state will store the current input value, and the todos state will contain the array of all tasks.
const [todo, setTodo] = useState('');
const [todos, setTodos] = useState(myArray);
By invoking the useState hook with an initial value of an empty string for todo and the myArray variable for todos, we set up the initial state of the component. The setTodo function will be used to update the todo state, and the setTodos function will be used to update the todos state.
Capture the changes in the submitted text
To capture the changes in the submitted text, we can use the onChange event on the input element. By setting the onChange attribute to (e) => setTodo(e.target.value), we can store the updated value of the input field in the todo state variable using the setTodo function.
<input type="text" onChange={(e) => setTodo(e.target.value)} />
Whenever the user modifies the input text, the onChange event will be triggered, and the new value will be captured and stored in the todo state variable using the setTodo function. This allows us to keep track of the changes made to the input field.
Handling empty string
const handleSubmit = ((e) => {
    e.preventDefault();

     if (todo != '') {
      setTodo([<here_value_will_be_stored>])
    }
  })
Inside the handleSubmit function, there is a condition if (todo != '') which checks if the todo variable has a value (is not empty). If the condition is true, it means that the user has entered some text in the input field.
Within the if statement, setTodo([<here_value_will_be_stored>]) will be called. This code is responsible for updating the todo state variable with the value entered by the user.
By setting the todo state to the desired value, the component will re-render, reflecting the updated state in the user interface.
Completing the handleSubmit function:
Inside the setTodo function, we want to append the new todo item to the existing todos array.
<here_value_will_be_stored>\=
[one todo that will be added] + [all the todos already added]
setTodos([ { id: Date.now(), task: todo },...todos])
setTodo('')
This code will append a new object with an id and task property to the todos array using the spread operator. The id is generated using the Date.now() method We do this id stuff because a map needs an unique id to remove or add element of that id.
Further, it will reset the value of the todo state to an empty string to clear the input field.
if (todo !== '') { setTodos([{ id: `${todo}-${Date.now()}`, task: todo }, ...todos]); }
`${todo}-${Date.now()}` : The resulting string will have the todo value followed by a hyphen and then the timestamp, creating a unique identifier for each to-do item.
After that we add value ={todo} inside the input
<input type="text" value={todo} onChange={(e) => setTodo(e.target.value)} />
WORKING ON EDIT FUNCTIONALITY
Setting up the edit state:
const [editId, setEditId] = useState(0);The
editIdstate variable is used to keep track of the todo item being edited. It stores the id of the todo item. Initially, it is set to 0, indicating that no item is being edited.Handling the edit action:
 const handleEdit = (id) => {
   const editTodo = todos.find((i) => i.id === id);
   setTodo(editTodo.task);
   setEditId(id);
 };
The
handleEditfunction is triggered when the user clicks the "Edit" button associated with a specific todo item. It receives theidof the item being edited as a parameter. It finds the corresponding todo item from thetodosarray using thefindmethod. Then, it sets thetodostate to the task of the selected todo item, allowing the input field to display the current task. Finally, it sets theeditIdstate to the id of the item, indicating that an item is being edited.Updating the todo item on submit:
 if (editId) {
   const editTodo = todos.find((i) => i.id === editId);
   const updatedTodos = todos.map((t) =>
     t.id === editTodo.id ? { id: t.id, task: todo } : t
   );
   setTodos(updatedTodos);
   setEditId(0);
   setTodo('');
   return;
 }
When the user submits the form while an item is being edited (i.e.,
editIdis not 0), this block of code is executed. It finds the todo item being edited using theeditIdfrom thetodosarray. It then creates a new array (updatedTodos) by mapping over thetodosarray and updating the task of the todo item that matches theeditIdwith the new value in thetodostate. Finally, it sets thetodosstate to the updated array, resets theeditIdstate to 0, and clears the input field by setting thetodostate to an empty string.
Validation check for edit functionality
Now the edit is also taking the empty string. To resolve that we can use something called as validation check
const handleSubmit = (e) => {
  e.preventDefault();

  if (editId) {
    const editTodo = todos.find((i) => i.id === editId);

    // Check if the edited todo is not an empty string or whitespace
    if (todo.trim() !== '') {
      const updatedTodos = todos.map((t) =>
        t.id === editTodo.id ? { id: t.id, task: todo } : t
      );

      setTodos(updatedTodos);
      setEditId(0);
      setTodo('');
    }

    return;
  }

  // Check if the new todo is not an empty string or whitespace
  if (todo.trim() !== '') {
    setTodos((prevTodos) => [
      { id: `${todo}-${Date.now()}`, task: todo },
      ...prevTodos,
    ]);
    setTodo('');
  }
};
Final code
App.js
import React, { useState } from 'react';
import './App.css';

const App = () => {
  const [todo, setTodo] = useState('');
  const [todos, setTodos] = useState([]);
  const [editId, setEditId] = useState(0);

  const handleSubmit = (e) => {
    e.preventDefault();

    if (editId) {
      const editTodo = todos.find((i) => i.id === editId);

      // Check if the edited todo is not an empty string or whitespace
      if (todo.trim() !== '') {
        const updatedTodos = todos.map((t) =>
          t.id === editTodo.id ? { id: t.id, task: todo } : t
        );
        setTodos(updatedTodos);
        setEditId(0);
        setTodo('');
      }

      return;
    }

    // Check if the new todo is not an empty string or whitespace
    if (todo.trim() !== '') {
      setTodos((prevTodos) => [
        { id: `${todo}-${Date.now()}`, task: todo },
        ...prevTodos,
      ]);
      setTodo('');
    }
  };


  const handleDelete = (id) => {
    setTodos((prevTodos) => prevTodos.filter((todo) => todo.id !== id));
  };

  const handleEdit = (id) => {
    const editTodo = todos.find((i) => i.id === id);
    setTodo(editTodo.task);
    setEditId(id);
  };

  return (
    <div className="app">
      <div className="container">
        <h1>To Do List App</h1>

        <form onSubmit={handleSubmit}>
          <input type="text" value={todo} onChange={(e) => setTodo(e.target.value)} />
          <button type="submit">GO</button>
        </form>

        <ul className="allToDos">
          {todos.map((item) => (
            <li key={item.id}>
              <div className="task">
                <span>{item.task}</span>
                <button onClick={() => handleEdit(item.id)}>Edit</button>
                <button onClick={() => handleDelete(item.id)}>Delete</button>
              </div>
            </li>
          ))}
        </ul>
      </div>
    </div>
  );
};

export default App;
App.css
.app {
  min-height: 100vh;
  display: flex;
  justify-content: center;
  align-items: center;
  background-color: #282c34;
  color: white;

}

.container {

  display: flex;
  flex-direction: column;
  align-items: center;
  justify-content: center;
  height: 80vh;
  border: 1px solid grey;
  padding: 20px;
  font-size: 20px;
  color: white;
  text-align: center;
  margin: 0 auto;

}


h1 {
  margin-bottom: 20px;
}

form {
  display: flex;
  align-items: center;
  margin-bottom: 20px;

}

input {
  padding: 5px;
  margin-right: 10px;
}

button {
  float: right;
  padding: 5px 10px;
  background-color: #61dafb;
  color: #282c34;
  border: none;
  cursor: pointer;
}

ul {
  list-style: none;
  padding: 0;
  margin: 0;
}

li {
  margin-bottom: 10px;
}

div {
  /* display: flex; */
  align-items: center;
}

span {
  margin-right: 10px;
}

button {
  margin-right: 5px;
}

button:last-child {
  background-color: #ff3860;
  color: white;
}
Browser output:
https://to-do-list-rust-pi.vercel.app/
Conclusion
Congratulations! You have now built a To-do list App using React hooks with functionalities of add, edit, and delete. You have also gone through other concepts like components, validation check, handling empty strings, etc. It's quite straightforward to develop.
Further, you can enhance the app by adding more functionalities like:
Implementing filtering options: Allow users to filter their to-do items based on their status (completed, pending, etc.) or other criteria.
Adding due dates and reminders:
Implementing drag-and-drop functionality:
Adding user authentication and data persistence: Implement user authentication to allow multiple users to have their own personalized to-do lists. Also, consider integrating a backend or database to persist user data, enabling users to access their to-do items across different devices.
I hope you enjoyed this article, and if you have any questions, comments, or feedback, then feel free to comment here or reach out via Twitter.
Thanks for reading!